The gloss gradient code we saw on Tuesday has got a lot of fairly arbitrary math in it – including both constants and functions – that “tunes” the final appearance of the gradient. Today I want to walk through some of that math, and see how it might be adjusted to dampen the caustic effect, and brighten the highlight.
Luminance Gloss Scaling
The perceptualGlossFractionForColor() function exists to scale the overall intensity of the gloss highlight; it does this by first converting the base color to a luminance value, and then returning the value of this computation:
pow(glossScale, REFLECTION_SCALE_NUMBER);where REFLECTION_SCALE_NUMBER is tunable, but currently hard-coded to 0.2. It’s important to note that this function doesn’t set the shape of the highlight – that’s controlled by calc_glossy_color() – or even the intensity of highlights in general – that’s controlled by REFLECTION_MIN and REFLECTION_MAX in drawGlossyRect:withColor:inContext: – but rather the extent to which highlights are dimmed for darker base colors.
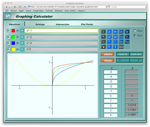
 As you can see in the curves to the left, as
 REFLECTION_SCALE_NUMBER approaches 0, the attenuation becomes “squarer”: all colors receive brighter highlights, but darker colors receive disproportionately brighter highlights. To the extent that one wishes to change highlight intensity for only one range of luminances, this is the contstant to adjust.
Caustic Color
The computation of a caustic color is probably the most complex part of the gloss gradient code. This computation is done by the perceptualCausticColorForColor() function, which contains more fiddly bits per line than any other piece of code.
In the simplest case, this function generates a caustic color by shifting the base color towards bright yellow (hue = 1/6, brightness = 1); the shift is greater for base hues closer to yellow. There are two exceptions to this rule: Base colors that are “too blue” (have a hue greater than MAX_BLUE_THRESHOLD) are shifted towards bright magenta (hue = 5/6, brightness = 1), rather than yellow, and base colors that are “too gray” (have saturation less than 0.001, and so have no well-defined hue) are assigned a special bright yellow with a hard-coded saturation (of GRAYSCALE_CAUSTIC_SATURATION) as a caustic.
I think it’s best to analyze this function by beginning at the end, and seeing how the final caustic color is computed:
UIColor* caustic = [UIColor colorWithHue:hue * (1.0 - scaledCaustic) + targetHue * scaledCaustic
			      saturation:saturation
			      brightness:brightness * (1.0 - scaledCaustic) + targetBrightness * scaledCaustic
				   alpha:inputComponents[3]];
As you can see, this code does a simple linear blend between the original color’s hue and brightness, and a “target” color’s hue and brightness, preserving the original saturation and alpha. The degree of blend is based upon the scaledCaustic variable, which is computed as follows:
float scaledCaustic = CAUSTIC_FRACTION * 0.5 * (1.0 + cos(COSINE_ANGLE_SCALE * M_PI * (hue - targetHue)));The first few elements in this expression are easy enough to understand:
- 1.0 is added to the result of
costo convert a [-1,1] range to [0,2] - 0.5 is multipled by a [0,2] range to convert it to [0,1]
CAUSTIC_FRACTIONscales the [0,1] range s.t. “fully shifted” is a blend between the original and target colors, rather than simply the target color itself. It determines the maximum amount of a target color that will be blended into a (non-gray) base color to produce a caustic.- The
cosexpression controls the degree to which a base color’s hue causes more or less (relative to other hues) blending to be used in the computation of its caustic.
 I had a good deal of trouble understanding the
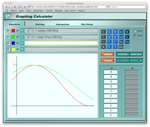
 cos expression; the difference between two hues can be understood as an angle, and, since cos is a trigonometric function, it seemed natural to me to apply some geometric rationale to this expression. This appears to have been a mistake. Consider the graph to the left: the red line plots the cos of the angle between a hue and 1/6 (scaled and shifted to the range [0, 1]), while the green line plots scaledCaustic (with a CAUSTIC_FRACTION of 1.0, and a targetHue of 1/6) for hues between -0.05 and 0.7 (hopefully the rationale for this somewhat bizarre domain will become clear as we move forward).
It is clear that scaledCaustic is not a function of the minimum angle to 1/6; there is no minimum at x=2/3, for instance. Instead, cos is being uses as a simple attenuation function that happens to be symmetric about 1/6 – the targetHue in this case. The choice of this function, and the choice to shift hues between 2/3 and 0.7 (among others) towards yellow means that, somewhat bizarrely, hues on different sides of 2/3 (pure blue) will be assigned different scaledCaustic values, despite being equidistant from yellow. (I’m tempted to set the MAX_BLUE_THRESHOLD threshold value at 2/3 to eliminate this problem.)
In terms of tuning, decreasing COSINE_ANGLE_SCALE will tend to equalize the shifts assigned to different hues, by increasing the shifts assigned to hues further from targetHue. Increasing COSINE_ANGLE_SCALE will have the opposite effect at first, but as this value approaches and passes 2.0, minima will begin to appear inside the function’s domain, and some “further” hues will being to receive larger shifts than other “nearer” hues. (I.e. don’t do this.) Increasing or decreasing CAUSTIC_FRACTION will enhance or dampen the caustic effect for all hues, but it is nonsensical to increase this value beyond 1.0.
There are three special cases:
- Colors with very low saturation
- Colors with a very high hue value
- Colors in the blue-red third of the hue wheel
Colors with very low saturation are assigned a caustic with the target hue, a hardcoded saturation (GRAYSCALE_CAUSTIC_SATURATION), and a maximum (CAUSTIC_FRACTION) blend between the base color and full brightness. If you don’t like the way your grays look, you might try adjusting GRAYSCALE_CAUSTIC_SATURATION for a more or less pronounced yellow tint in their caustics.
Colors with a very high hue value (>= 0.95) are ‘wrapped’: they are decremented by 1 (yielding the -0.05 domain bound seen above).
There’s a chance that this hack could allow a sufficiently small scaledCaustic to produce a negative hue in the final color; you probably don’t want to lower CAUSTIC_FRACTION below ~0.15, the minimum value that will preclude this from happening. This wrapping appears to have been done s.t. the colors immediately to the “left” (blue side) of pure red (hue = 0) could be shifted towards yellow; if the normalized hues of those colors were used, they would “break” the cos attenuation function.
Colors with hues between 0.7 (slightly to the red side of pure blue) and 0.95 (slightly to the blue side of pure red) are shifted towards magenta, not yellow. I can’t see why the original code “cheats” these borders into this third of the hue wheel. It seems that a lot of ugliness could be avoided if the borders were at 2/3 and 1.
Gradient Shapes
The “shapes” of the highlight and caustic gradients are determined by some exponential functions in calc_glossy_color(). This function has two distinct halves, one each devoted exclusively to the highlight and caustic gradients. Let’s consider the highlight half first.
The output color is computed by this code:
out[0] = params->color[0] * (1.0 - currentWhite) + currentWhite;
out[1] = params->color[1] * (1.0 - currentWhite) + currentWhite;
out[2] = params->color[2] * (1.0 - currentWhite) + currentWhite;
out[3] = params->color[3] * (1.0 - currentWhite) + currentWhite;
which does a linear blend between the base color and pure white; the blend proportion is given by currentWhite. CurrentWhite is computed by this code:
float currentWhite = progress * (params->finalWhite - params->initialWhite) + params->initialWhite;which does a linear interpolation between the initial (brightest) and final (dimmest) highlight fractions. This interpolation is driven in turn by progress, which is computed by this code:
progress = 1.0 - params->expScale * (expf(progress * -params->expCoefficient) - params->expOffset); Here, the
 progress input is a number between 0 and 1 that describes a normalzed position in the highlight portion of the gradient. If you consult drawGlossyRect:withColor:inContext:, you’ll see that expScale and expOffset are derived from expCoefficient s.t. this function’s range is limited to [0, 1]. Without (further) belaboring the matter (too much):
expf(progress * -params->expCoefficient)maps a [0, 1] domain to a [1, M] range- Subtracting
params->expOffsetmaps a [1, M] domain to a [1-M, 0] range - Scaling by
params->expScalemaps a [1-M, 0] domain to a [1, 0] range - Subtracting from 1 maps a [1, 0] domain to a [0, 1] range
The function expands to:
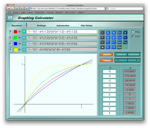
1.0 - 1.0/(1.0 - expf(-params.expCoefficient)) * (expf(progress * -params->expCoefficient) - expf(-params.expCoefficient))Several plots of this, for different values of expCoefficient, can be seen above.
- Blue is plotted with an
expCoefficientof 0.6 - Red is plotted with an
expCoefficientof 1.2 (the supplied value) - Green is plotted with an
expCoefficientof 2.2 - Yellow is plotted with an
expCoefficientof 6.0
Basically, as expCoefficient increases, the highlight gradient’s progression becomes less linear, and changes more rapidly near the top of the button.
The caustic half of the gradient is very similar. The output color is computed by this code:
out[0] = params->color[0] * (1.0 - progress) + params->caustic[0] * progress;
out[1] = params->color[1] * (1.0 - progress) + params->caustic[1] * progress;
out[2] = params->color[2] * (1.0 - progress) + params->caustic[2] * progress;
out[3] = params->color[3] * (1.0 - progress) + params->caustic[3] * progress;
which does a linear blend between the base and caustic colors; the blend proportion is given by progress, which is computed by this code:
progress = params->expScale * (expf((1.0 - progress) * -params->expCoefficient) - params->expOffset); Here, the
 progress input is a number between 0 and 1 that describes a normalzed position in the caustic portion of the gradient. Without (further) belaboring the matter (too much):
- Subtracting from 1 maps a [0, 1] domain to a [1, 0] range
expf(X * -params->expCoefficient)maps a [1, 0] domain to an [M, 1] range- Subtracting
params->expOffsetmaps an [M, 1] domain to a [0, 1-M] range - Scaling by
params->expScalemaps a [0, 1-M] domain to a [0, 1] range
The function expands to:
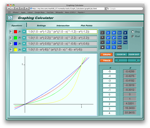
1.0/(1.0 - expf(-params.expCoefficient)) * (expf((1.0 - progress) * -params->expCoefficient) - expf(-params.expCoefficient))Several plots of this, for different values of expCoefficient, can be seen above.
- Blue is plotted with an
expCoefficientof 0.6 - Red is plotted with an
expCoefficientof 1.2 (the supplied value) - Green is plotted with an
expCoefficientof 2.2 - Yellow is plotted with an
expCoefficientof 6.0
Basically, as expCoefficient increases, the caustic gradient’s progression becomes less linear, and changes more rapidly near the bottom of the button.
Summary
Ok, that was a little long. As you can see, there are an awful lot of arbitrary elements in this code, driven more by what “looks right” than any physical rationale. Here’s a quick guide to the most tweakable constants:
REFLECTION_SCALE_NUMBERaffects the relationship between a base color’s luminance and the intensity of its highlight. As this constant decreases, the relationship becomes less linear, and only the darkest colors have their highlights noticeably dimmed.REFLECTION_MINandREFLECTION_MAXcontrol the overall intensity of the top and bottom of the highlight. Increase them for brighter highlights.COSINE_ANGLE_SCALEaffects the relationship between a base color’s hue and the size of the shift used to create the caustic. Decreasing this constant will tend to equalize the shifts between different hues.CAUSTIC_FRACTIONaffects the overall size of shifts used to generate caustics. Decreasing this constant will tend to produce less dramatic caustics. It might be dangerous to reduce this constant below ~0.15, due to some hacks in the code.GRAYSCALE_CAUSTIC_SATURATIONcontrols the intensity of the caustics generated for grays.EXP_COEFFICIENTcontrols the ‘shape’ of the gradient; as it increases the gradients change more rapidly at the top and bottom of the button relative to its center.
 I found the following adjustments to my liking; your mileage may vary:
- Reduced
CAUSTIC_FRACTIONfrom 0.60 to 0.35 - Increased
EXP_COEFFICIENTfrom 1.2 to 4.0 - Increased
REFLECTION_MAXfrom 0.60 to 0.80


Pingback: Things that were not immediately obvious to me » Blog Archive » Timing (Clipping)